Showing posts with label Cracker style. Show all posts

Tuesday, November 6, 2012

My first attempt at cloning Shakey's

Three days ago I decided it was finally time for me to try cloning Shakey's pizza. Having only ever eaten at Shakey's four times (between 2006 and 2012), it seemed pretty inevitable that figuring out how to make a good Shakey's clone would require a ton of time and effort. However, there are a lot of very good Shakey's clues available on internet message boards, written by people who once worked at Shakey's, as well as some good espionage results from people who have never worked at Shakey's. So good news: After making only one batch of Shakey's clone dough so far, I've already made some pretty incredible pizza. I won't go so far as to call it a Shakey's clone yet, but I'd say it's pretty close.

Become a fan of this blog on Facebook!
The most useful pizzamaking lesson you'll ever learn.

Sorry, I haven't taken a lot of pics yet. But what I have, I'll share. Besides, I'll eventually write another post about cloning Shakey's, with pics to document almost every step.

Add caption

The above pic is of my first attempt at cloning Shakey's, as are the next two pics. This pizza (crust) was good, but my second attempt with the same dough was much better. (There are a few pics of the second pizza below.)

Open this pic in a new window to get a better look at the crust.
As you should see, I used cornmeal on the bottom of the crust. Won't do that again.

You can probably tell that this pizza was a little thicker than a real Shakey's pizza.
Still, it was very good, and the excessive thickness helped me
figure out how to make a better pizza the next day.

The next three pics are from my second pizza, which was made of the same dough as the first pizza. I made some minor changes in how I handled the dough for this pizza, including rolling it thinner than I rolled the first pizza.

I recommend opening each of the following three pics in a new window so you can zoom in close enough to see what made this pizza so awesome.

Add caption

Add caption

Add caption

The formula I used for this dough was as follows:

100% Pillsbury bleached all-purpose flour
40.02% Water
1.33% Active dry yeast
1.53% Salt
6.67% Oil
1.63% Sugar

And the recipe to make 34 oz of dough:

22.49 oz Pillsbury bleached all-purpose flour
9 oz Water
3 tsp Active dry yeast
2 tsp Salt
2.25 oz Oil
3 tsp Sugar

I don't feel like writing all the procedures right now, but I may edit this post to add instructions because there's some pretty important information you need to know if you're going to try to make this kind of pizza (like dough management and how to laminate the dough skins). Regardless of whether I post instructions here, there will eventually be instructions somewhere (probably in a future post). Please come back later to see if I've added anything.


Update (6/11/13)

I actually spent quite a while working on this kind of pizza last fall, eventually making a fantastic Shakey's clone, as well as many similar pizzas that were all pretty phenomenal. There are just so many small changes you can make with this kind of dough/crust, all of which lead to similar but slightly different versions of a Shakey's-style pizza. I have a lot of very useful notes somewhere in this computer (and probably some pictures, too), and maybe someday I'll dig them up and reveal some useful information.


Update (8/5/13): I just found a picture I had pretty much forgotten about.

Standing in front of Shakey's in Redlands, California (10/6/08).


Also, having done a ton of investigating, I'm almost positive I have figured out almost the exact formula for Shakey's dough.

100% AP Flour
40% Water
1.1% Instant dry yeast
1.5% Salt
4.36% Shortening (or possibly as much as 6%)
1.51% Sugar

Sunday, September 30, 2012

Tommy's Pizza (Columbus, Ohio) clone

Like this blog on Facebook!
The most useful pizzamaking lesson you'll ever learn.

[This is a good post, but I made a lot of breakthroughs during the summer of 2013. There is a very important update at the end of this post. The update contains a major formula change, which is light years better than the formula I used prior to 8/3/13. But I've shared even more recent breakthroughs in a very thorough, step-by-step list of instructions at Reply #332 of the Tommy's thread on pizzamaking.com. (This link is supposed to take you straight to Reply #332, but it doesn't, so you'll probably need to scroll down quite a bit.)]

This style of pizza has kind of become my specialty because a couple years ago someone on pizzamaking.com started a thread asking if anyone knew how to make a Tommy's clone. At the time, I had no clue how to clone Tommy's, but I gave it a try anyway. My first attempts were not even close, but I kept trying, using my failures as a learning tool. Two years later, I probably know more about how to make a vintage Tommy's-style pizza than anyone, possibly including the owners of Tommy's.

This post will teach you everything you need to know about how to make a near-perfect clone of the pizza Tommy's produced 20 years ago. (Nowadays Tommy's just isn't the same as it was back then. If you go to Tommy's today, it won't look like the pizzas in my pictures, nor will it be nearly as good as the pizzas in my pictures.)

Whole Tommy's-style pepperoni pizza made at home. (This one didn't actually turn out
quite like a Tommy's pizza, but it was my most photogenic whole pie, so I used it here.)

Side view of a slice, showing separation between the laminates.

After about a hundred attempts at cloning this pizza (if not more), I've finally settled pretty confidently on this dough formula:

100% KAAP flour
56% Water
1% ADY
2% Salt

To make two 11" pizzas (or one 15" pizza), here's an appropriate dough recipe:

18.78 oz KAAP flour
10.52 oz Water
2.35 tsp ADY
2.73 tsp Salt

Special equipment you'll need for this pizza:

All right. So let's make one of these pizzas. The following directions are specifically to make one 11" pizza (although the recipe makes enough dough for two 11" pizzas or one 15" pizza).

Here's how to make the dough:
  1. Measure the appropriate quantity of yeast (2.35 tsp) and put it in your mixer bowl.
  2. Measure the appropriate quantity of 110-degree water (10.52 oz) and pour about 2 oz of it into the mixer bowl.
  3. Stir the yeast water to make sure there are not clusters (or clumps) of yeast.
  4. Measure the appropriate quantity of flour (18.78 oz) and set aside.
  5. Measure the appropriate quantity of salt (2.73 tsp) and add it to the flour.
  6. Use a wire whip or spoon to incorporate salt into the flour.
  7. Check the yeast water. If it is foamy, it means the yeast is alive and hydrated, so move on to the next step. If the yeast water is not foamy, wait 5 minutes and check again. After 5 minutes, go ahead and move on to the next step, even if the yeast water is not foamy. (The yeast is probably fine, but be aware that this may mean your yeast is dead. So if your pizza ends up showing no sign of fermentation, buy some new yeast and try again.)
  8. Add the rest of the water to the mixer bowl.
  9. Add the flour/salt mixture to the mixer bowl.
  10. Place the mixer bowl in its place on the mixer and attach the dough hook.
  11. Mix the dough for about 3 minutes, or until it looks about like the dough in the picture below.


  12. This is how the dough should look when it's finished mixing.

  13. If you've used the amount of ingredients called for in my recipe above, divide the dough into four 7.5-ounce pieces of dough.
  14. If you only intend to make one pizza, put two of the dough pieces in a ziploc bag and refrigerate. If you intend to make two pizzas, skip this step. (IMPORTANT: Each pizza you make will use two pieces of dough.)
  15. Place the pieces of dough that you'll be using on a pan that's comfortably bigger than the space occupied by the pieces of dough, with a couple inches between each dough piece, then cover the dough with a large plastic bowl (inverted).
  16. Let the dough rise at room temperature for about 4 hours.

Once the dough is ready to use, follow these instructions.
  1. Preheat your oven to 500 degrees, with a baking stone on the bottom rack.
  2. After the oven has preheated for about half an hour, place the pieces of dough on your work surface.


  3. Two pieces of dough waiting to become a dough skin.

  4. Use your fists to flatten the two pieces of dough as much as you can.


  5. After smashing the pieces of dough (with my fists) until the dough is flat.

  6. Coat each piece of dough with bench flour and set one of the dough pieces aside.
  7. Roll one piece of dough into roughly a square shape. If the dough sticks to the counter while you roll it, add just enough bench flour to keep it from sticking.
  8. As the dough reaches dimensions of about 10" x 10" (if you are making an 11" pizza), stop adding bench flour and allow the dough to stick to the counter a little as you roll it. (If you keep flouring the dough after this point, you'll never be able to roll it as thin as you need to.)
  9. Once the dough has reached dimensions of at least 14" x 14", dust the top of the dough with bench flour (as pictured below). It's OK to use a little more flour than I used in the pic.

  10. Roll the dough until it's almost as thin as possible, then add bench flour.

  11. Fold the dough in half and dust the top with bench flour.


  12. Fold the dough in half, then add bench flour.

  13. Fold in half the other way, making the dough relatively square, with four layers of dough.


  14. Fold the dough in half the other way. There should now be four layers of dough.

  15. Set this piece of dough aside and grab the other piece of dough.
  16. Repeat Steps 5-9 with the second piece of dough.
  17. When you're finished with all these steps, you should have two flat pieces of dough, each with four laminates.


  18. Both pieces of dough after rolling and folding.

Now catch your breath for a minute and resume the rest of the dough-rolling process.
  1. Stack one piece of dough on top of the other.


  2. One piece of dough on top of the other, before rolling into a dough skin.

  3. Use your fists to press the two pieces of dough together.
  4. Using bench flour when necessary, roll the dough until it is just a hair bigger than your pan.
  5. When the dough is slightly larger than the pan, set the pan atop the dough and use a pizza wheel to cut off the excess dough.


  6. Using a pan as a template to cut the dough to the right skin size.

    Showing how I use a pan as a template to cut the dough skin.

  7. Weigh the dough. (At this point the dough will still be a couple ounces heavier than you ultimately want it. That is, it will probably weigh about 13 oz.)
  8. Roll the dough some more, until it is about an inch bigger than the pan.
  9. Trim and weigh the dough again. Continue this process until the dough is the weight you want. (Put the dough scraps in a bag and immediately into the fridge. If you intend to make another batch of this dough within the next few days, you can add small pieces of this dough to the next batch as it mixes. If you don't plan to make any more Tommy's dough, you can make a pizza out of the scraps at any time over the next few days.)


  10. Dough skin on scale, showing that the skin weighs about 11 oz.

  11. Once you have trimmed your dough to the target weight of 11-11.5 oz, roll the dough just a little bigger than the pan you'll be using (because dough always snaps back to a smaller diameter after you roll it).
  12. If you are satisfied that your dough skin is as big as it needs to be, go ahead and spray the pan with nonstick spray, then place your dough skin on the pan. Note: This dough should not be docked.
  13. Adjust the dough skin with your hands to make it fit the pan.
  14. [Optional] If you don't want to bake the pizza until later in the day, it is OK to refrigerate the skin for up to at least 10 hours. When I do this, I put the skin on the sprayed pan and apply the sauce, to keep the dough from drying out while it sits in the fridge for hours. (Also, when I'm almost ready to bake, I remove the skin from the fridge 15 or 30 minutes before I intend to begin baking.) If you leave the dough skin at room temperature for very long (without refrigerating), the skin will continue to ferment (rise), and the pizza will end up bready, without any layers. If you refrigerate the skin for a couple hours (or longer), the bottom of the crust will likely blister while the pizza bakes.

Now let's top the pizza and bake.
  1. Top the skin with about 5 oz of sauce. Distribute the sauce all the way to the edge of the skin. (I normally would not use anywhere near this much sauce, but I can't taste this particular tomato product unless I use that much. I'll give you a sauce recipe below, and I'll also explain why I use this tomato product.)


  2. Skin with sauce, showing that I use a lot of sauce on this one.

  3. Add about 6.5 oz of provolone or mozzarella cheese. (I'm pretty sure Tommy's uses provolone, but mozzarella works just fine.) Make sure to apply the cheese all the way to the edge of the skin.
  4. Add whatever toppings you want above the cheese.


  5. Dough skin topped with sauce, cheese, chicken, bacon, and jalapenos.

  6. Sprinkle parmesan or romano cheese over the top of the pizza.
  7. Open your oven door and set the pan on the baking stone (on the bottom rack).
  8. Bake.
  9. After about 7 or 8 minutes, start watching the pizza carefully through the oven window because the crust will probably begin to bubble at about this point. Once you start seeing bubbles, quickly use a grill fork to pop the bubbles. Close the oven door as soon as possible.
  10. Once the pizza has been baking for about 10 minutes, use a pot holder or pan grabber to pull the pan out from under the pizza. (If you did not thoroughly preheat your stone, the pizza may not be ready to leave the pan for another few minutes. If the pizza does not easily come off the pan, don't force it. Instead, give it a couple more minutes on the pan before pulling the pan and moving on to the next step.)
  11. Let the pizza finish directly on the stone for another minute or two.
  12. After this time is up, use a metal peel (or cookie sheet) to retrieve the pizza from the oven.


  13. Overhead view of a chicken, bacon, and jalapeno pizza.

  14. Set the pizza on a screen or cooling rack for a minute before cutting.
  15. Cut the pizza. (For an 11" pizza, cut it into rectangles, using four cuts one way and two perpendicular cuts, as pictured.)


  16. Overhead view of a cut pizza. 4 cuts by 2 cuts.

  17. Eat.

And here are some more good pictures of Tommy's style pizzas I've made. Scroll below these pictures to find out how to make sauce for this pizza.

Profile of a pizza just after baking.

Side view of a Tommy's Pizza clone slice with a couple bites out of it,
showing separation between the laminates.

Side view of a slice, showing separation.

This is how I remember the bottom of Tommy's Pizza crust when I was a kid.
If you go to Tommy's today, it won't look like this.

Bottom of a Tommy's Pizza clone slice.

This is my favorite Tommy's Pizza clone pic because I think it shows how crispy
and flaky the bottom of the crust is when you do it right.

This is the one picture that shows I made a pretty damn good clone of Tommy's
Pizza: Lotsa little flakes from the bottom of the crust.

Now for the sauce recipe (which I haven't quite perfected yet):

1 28 oz can of Dei Fratelli crushed tomatoes
1/2 tsp dried basil
2 tsp dried oregano
1/2 tsp salt

Dei Fratelli crushed tomatoes.

I want to make it clear that I don't particularly like Dei Fratelli crushed tomatoes. The only reason I use them is because I think they may be essentially the same product as the crushed tomatoes Tommy's uses for their sauce. Last time I ate at Tommy's, I did a little investigating in their dumpster. In their dumpster I found a box for Star Cross crushed tomatoes (see below). After I mentioned the details of the box on the Tommy's thread at pizzamaking.com, someone responded by saying Dei Fratelli may be the same product, since both products are packed by the Hirzel Canning Company of Toledo, Ohio.

Having gone through a few cans of Dei Fratelli crushed tomatoes, I feel pretty confident that they are very similar to the Star Cross crushed tomatoes (if they're not the same thing). Like I said, I don't think this tomato product is very good. But it's probably the right thing to use if you really want to clone Tommy's.

Star Cross crushed tomato box 1.

And here's something else I found in the dumpster, which I think is a very important part of cloning Tommy's. Usually it's very difficult to get pepperoni like this without buying an entire case (25 lbs), but PennMac breaks up cases of Ezzo pepperoni and repackages it in 1 lb bags. I'm not sure if the Ezzo pepperoni available from PennMac is GiAntonio or if it's some other Ezzo variety.

I did some dumpster diving at Tommy's and found that they use
Ezzo GiAntonio 38 mm pepperoni.

Tommy's menu indicates that their pizzas are available in sizes of 11", 13", and 15". However, if you order a 15" pizza at Tommy's, the pizza they bring you is only 14". And if you get a small box for your leftovers, the box is 10", not 11". This incorrect menu information is not an accident. It's not because Tommy's recently changed the sizes of their pizzas but haven't had a chance to update the menu. It's not because the pizzas shrink an inch while baking (because the pizzas don't shrink). Although I think their pizzas used to be 11", 13", and 15" once upon a time, their current menu's misrepresentation of sizes is clearly a deliberate attempt by Tommy's ownership to mislead their customers, and I have a big problem with that. You should too.

So next time you think about buying pizza from Tommy's, I invite you to instead try to make it yourself by following my instructions. (Joseppi's and Cappy's also lie about the size of their pizzas, so maybe I'll make an effort to figure out how to clone their pizzas soon, too.)


Update (10/1/12): Just after I finished writing this post, I saw that there was a relatively new post on the Tommy's thread at pizzamaking.com. The new contributor, fatzo, speculated that there may be red wine in Tommy's sauce, and I feel like he(?) just may be right about that, even though I had never thought about anything like that before. Something to think about. (If you read that post, go ahead and read the post right before it, too, also from fatzo.)


Update (10/2/12): This just occurred to me. I think I need to use a bleached all-purpose flour, rather than KAAP, which is unbleached.

I was just looking at some pics of an actual Tommy's pizza, and I realized how much whiter their pizza is than my clone. I was already aware of this, I guess, but apparently I needed to see the pictures again for it to register. So whenever I make another Tommy's clone, I will use a bleached all-purpose flour.


Update (8/5/13): I made some Tommy's style pizzas Saturday for the first time in a long time, for a pizza party. My dough formula was supposed to be kind of a Tommy's/Shakey's hybrid, but I ended up making three nearly-perfect Tommy's clones. Here's the formula I used:

100% Pillsbury AP flour
41.56% Water
1.96% ADY
1.5% Salt
2% Shortening
1.06% Sugar

To make 30 oz of dough, use:

20.26 oz Pillsbury AP flour
8.42 oz Water
3.97 tsp ADY
1.77 tsp Salt
0.41 oz Shortening
1.76 tsp Sugar

I made the dough about 24 hours in advance. Mix time was about 7 minutes (with spiral dough hook). Bulk fermented at room temperature for about 2-1/2 hours. Punched down and refrigerated for about 16 hours. Punched down again after I removed the dough from the fridge, then scaled dough, and allowed to warm at room temperature for an hour or two, then rolled, trimmed, DOCKED, and immediately put the covered dough skins in the refrigerator. Removed each skin 15-30 minutes before baking. Baked each pizza directly on stone at 500 for about 8 minutes. (That is, I didn't use a pan.)

The only thing I can think of that I did differently from the steps in the main part of this post is that I added no bench flour to the dough before folding. Oh yeah, and I docked the dough after the final trim, then baked directly on stone (instead of a pan). I also used Ezzo GiAntonio pepperoni on these pizzas, atop Grande whole milk mozzarella. Changes I plan to make with the next batch: ADY probably needs to drop a little, to about 1.5%; shortening should be increased from 2% to 3%; very small hydration increase.

Thursday, September 20, 2012

Pizza Hut Thin & Crispy clone

(Like this blog on Facebook!)

Even though this is the first style of pizza I'm sharing on this blog, I've only made about five of these pizzas so far. Needless to say, that's not much experience. Regardless, I've already created a near-clone. As I continue trying to make a better clone, I'll add formulaic and procedural updates at the bottom of this page.

This pizza wasn't quite a perfect clone; I'd say I got it about 90% right. However, I'm confident that if I had delivered it to someone in a Pizza Hut box, they wouldn't have known the difference. If you follow my instructions carefully, you will be able to make a Pizza Hut thin & crispy clone as well. Find out how to do it yourself.


A slice of my Pizza Hut Thin clone.


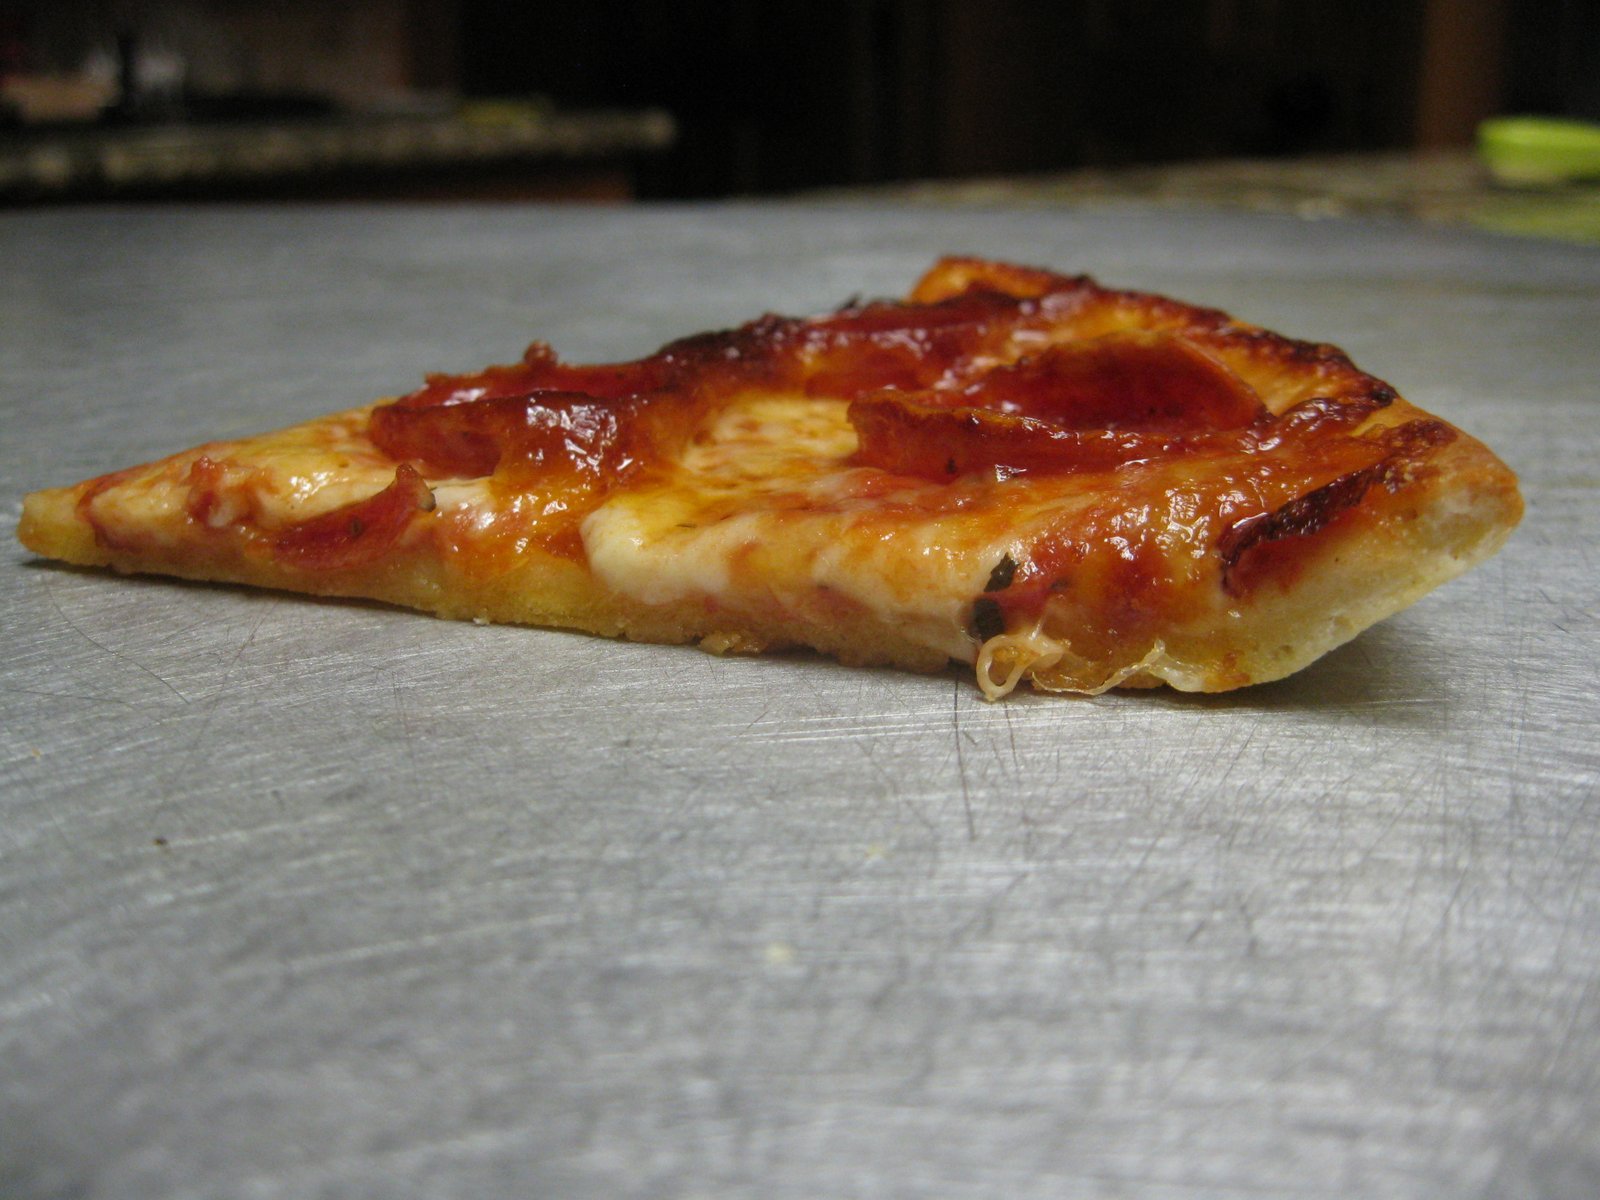
Profile of Pizza Hut Thin clone.


Overhead view of Pizza Hut thin clone.

Specialized equipment you'll need for this pizza (all of which will be pictured later in this post):
  • A cutter pan, seasoned on the bottom. I'm using a 10" pan, which I bought at a restaurant equipment supply store. Here's how to season your cutter pan.
  • Dough docker. You can get a cheap one of these for about $10, or a good one for about $20, at any restaurant equipment supply store, or possibly at a cook store. (I use a cheap one.) I buy all my equipment at restaurant equipment supply stores, and you should, too, because cook stores sell crap.
  • Pastry roller. I don't think I've ever seen one of these at a restaurant supply store, so you might have to get this from a cook store.

Here's the formula I used for today's dough, which I based on 1 pound of King Arthur all purpose flour:

100% KAAP flour
37.5% Water
1.25% ADY
1.61% Salt
3.13% Canola oil
0.38% Sugar

Since this blog is new, and because there might be people reading this who have no idea what all that stuff means, here's the ingredient measurements I used. (Flour and water are measured by weight, not volume.)

16 oz King Arthur all purpose flour
6 oz Water
2 tsp Active dry yeast
1.5 tsp Salt
1 Tbsp Canola oil
1/2 tsp Sugar

The picture on the right shows how the dough should look immediately after mixing for 10 minutes in a KitchenAid Professional 5 mixer with a spiral dough hook.

As you should be able to tell by looking at the picture, this is a very stiff dough. It's probably the stiffest dough I've ever made, and it's probably the stiffest dough I ever will make. Normally I don't mix for anywhere near 10 minutes, but with this batch the dough hook had a difficult time reaching this dough because the dough was in so many small pieces, instead of one piece. With any dough as stiff as this one, be sure to stay near your mixer during the mixing period because this dough could damage your mixer if you're not careful.

If you don't want to risk ruining your mixer (or if you don't have one), this kind of dough can also be mixed in a food processor. In fact, I think the food processor works better than a mixer for this kind of dough, even though Pizza Hut does not mix their dough in food processors. I will write another post about making this kind of dough in a food processor. (Hopefully soon.)

Procedures for mixing the batch size I made:
  1. Measure 2 tsp of ACTIVE DRY YEAST and place in mixer bowl. (If you use a different kind of yeast, 2 tsp will not be the right measurement. For example, if you use instant yeast, you will want to use 1/2 or 1/3 as much as the amount of active dry yeast used in any dough formula.)
  2. Measure 6 oz of warm water (110 degrees) and pour about half of it into the bowl of yeast.
  3. Stir the yeast water if you feel so inclined.
  4. Add 1/2 tsp of sugar to the yeast water.
  5. Measure 16 oz of King Arthur all purpose flour and set it aside.
  6. Measure 1.5 tsp of salt and add to the flour. Stir the flour a little to incorporate the salt evenly within the flour.
  7. When the yeast is clearly dissolved in the water, after about 10 minutes, add the rest of the water to the yeast water. (The yeast water should be foamy before you add the rest of the water, but it may be ready even if the yeast water does not become foamy, depending on various factors.)
  8. Add 1 Tbsp of oil to the water.
  9. Add the flour to the wet ingredients.
  10. Incorporate all the ingredients by hand for 10 or 20 seconds, using the dough hook or a spoon.
  11. Using your mixer, with the dough hook attached, mix the dough for 5 minutes, or until it looks like a shaggy mess. Even though the dough will not seem very well mixed, this will be long enough because the dough will come together better as it ferments.
  12. Cover the bowl with plastic wrap and let the dough rest for about half an hour in a warm environment.
  13. After half an hour, cut off a piece of dough about twice as heavy as you will need for your pizza. (For example, I'll be making a 10" pizza, which will require about 6.5 oz of dough, so I used a 13 oz piece of dough.)
  14. Dough shortly after mixing.
  15. Put the dough back in your mixer bowl and cover with plastic wrap.
  16. Put the rest of the dough in a ziploc bag and into the refrigerator. You can use this dough the next day or up to several days later.
  17. Let the dough ferment for at least five hours at room temperature. (You might even be able to let this dough ferment at room temperature for 24 hours or longer. I can't say for sure right now, though, because I haven't tried it yet.) 
    Dough five hours after mixing. By comparing this pic to the previous pic,
    you should be able to see that the dough will rise, but it won't rise a lot.
When you're ready to make a pizza, set your oven to bake at 500. I keep a baking stone in the oven, which I pre-heat well in advance of baking the pizza, but that may not be necessary for this kind of pizza, since the pizza will bake entirely in a pan, rather than directly on the stone.

Now comes the hard part: rolling the dough.

  1. Remove the dough from mixer bowl and place on your work surface (counter).
  2. Flatten the dough as much as you can using your hands.
  3. Without adding flour, roll the dough with a rolling pin.
  4. Roll the dough until it is larger than your cutter pan. Basically you want to roll it almost as thin as you can. (This will take a lot of work, and you'll probably never do it again.)
  5. Top of the cutter pan, just before trimming the dough.
    The bottom (seasoned side) of a 10" cutter pan.
  6. When the dough is as thin as you think it should be, spray your pan lightly with nonstick spray and drape the dough over the pan so it covers the entire pan.
  7. Use your fingers to press the dough into the "corners" of the cutter pan so the dough hugs the surface of the pan.
  8. Dock the dough. (Alternatively, you could dock the dough before Step 5.)
  9. Use the pastry roller to cut the excess dough on the lip of the pan. (Add the scrap dough to the bag with the rest of the dough from earlier, then put it back in the refrigerator.)
  10. The dough after being docked and trimmed. Also, a pastry roller (left) and
    dough docker (right).
    This is a little misleading because the pan weighs about 10 oz.
    Consequently, the scale is showing that the dough skin
    weighs a little over 7.5 oz, not 17.5 oz.
  11. If you've made a 10" pizza, top the dough skin with 3 oz of sauce and 4 oz of cheese. Add toppings however you want.
  12. 10" dough skin with 3 oz of sauce.
    5 oz of cheese. (That may be a little too much.)
    Pepperoni.
  13. Bake at 500 for at least 10 minutes. If you roll the dough extremely thin, the pizza will be done after 10 minutes, but thicker dough will take longer. Unless you make an excessively thick dough skin, this pizza should be finished by 12 or 13 minutes. (All ovens are a little different, so your results may be slightly different.)
  14. This pic shows that I baked on the stone on the bottom rack of the oven.

Remove the pan from the oven, and transfer the pizza from the pan to a cutting surface. If you've made a 10" pizza, cut it into 6 pieces. (Cut a 12" pizza into 8 pieces. Cut a 14" pizza into 12 pieces.)

Eat

The sauce I'm currently using for this kind of pizza consists of:
  • 28 oz crushed tomatoes
  • 2 tsp dried oregano
  • 1/2 tsp dried basil
  • 1/2 tsp salt
Don't cook the sauce. Cooking pizza sauce is the easiest way to ruin it. Just mix the ingredients and keep refrigerated.


One slice turned over to show you the extent of browning.
I like bite-mark pics because I think they make the best profile pics.
Get used to seeing this kind of pic.
This pic shows the rigidity of the slice.


Update (9/22/12): I made a much different dough for this style last night, using a lot of oil and a very low hydration, mainly as an experiment. After about 12 hours of room temperature bulk fermentation, it's clear that the hydration for this formula is too low to work. Here's the formula:

100% KAAP
29% Water
2% ADY
2% Salt
10% Oil
0.6% Sugar

Even though this dough feels nothing like real Pizza Hut dough, and even though I want to just toss it, I'm still gonna try to make a pizza out of it. However, I'm also going to make another batch of dough, with 32% hydration, to make at about the same time. (Note: I made this dough at about 9:00, and I intend to use it mid/late-afternoon.)


Update (9/22/12, 2:00 pm): Well, forget that idea. While my dough was in the oven on bread proof mode, about an hour ago, somehow the oven got turned on and melted the bowls of dough. It probably happened because someone bumped the horribly-designed, dangerous KitchenAid oven control panel, accidentally and unknowingly turning on the oven. I subsequently made another batch of dough.


Update (9/25/12): Below is the formula I used for the dough I made last night, which I bulk fermented overnight and used today.

100% KAAP
38% Water
2% ADY
1.5% Salt
3% Oil
1% Sugar

This one was really close; definitely better than the dough from the beginning of this post, which was pretty good itself.

My previous batch of dough used 5% oil, and that was obviously too much, as the crust was biscuity. After decreasing the oil from 5% to 3%, it became clear that the unwanted biscuity texture had resulted from the higher oil content. But there was still a hint of biscuity texture with today's pizza, which tells me there should not be any more than 3% oil in this dough, and in fact that 3% is probably too much oil. So my next batch will contain 2% oil.

I increased the sugar by a considerable amount from the previous batch, but I think it still needs to be a little higher because the crust isn't browning quite as much as it should.

Also, 2% ADY is not enough. I let this dough bulk ferment at room temperature for 18 hours, and it still seemed a little underfermented. Keep in mind that Pizza Hut starts using their dough only a few hours after they mix it (if they still make the dough on site). That means I probably need to increase the yeast at least another percent. I'll go with 2.5% ADY with the next batch (which I won't make until tomorrow).

The stiffness of this dough felt just about right. Because I'll be dropping the oil percentage by 1% with the next batch, I'll also increase the hydration by 1%.

The formula for the next batch will be:

100% KAAP
40% Water
3% ADY
1.5% Salt
2% Oil
1.5% Sugar

Also, I've been mixing the dough longer than I mixed the dough at the beginning of this post, and I'd say that's the right thing to do.


Update (9/27/12): That didn't work. I made a pizza today after a 19-hour room-temperature bulk ferment. Even though the dough was very stiff when I mixed it, the crust ended up soft and sorta bready. I attribute this to the very high yeast percentage. Also, the crust had a blonde hue that just doesn't look like PH to me. I think this is from the oil, and I think other unwanted characteristics are from oil, too. So I'm not going to put any oil in the next batch. And I'm still not seeing the kind of browning I want, so I will increase the sugar a little in the next batch.

Next batch of dough will be:

100% KAAP
40% Water
2% ADY
2% Salt
2% Sugar


Update (9/28/12): I learned something today.

The reason yesterday's pizza was soft, pale, and icky is because it was overfermented after a 19-hour room-temperature bulk ferment. Today's pizza was not like that, even though it was made from the same dough. The difference is that the dough I used today had been refrigerated until this morning, at which point it began an 8-hour room-temperature bulk ferment. With the same thickness and bake time, today's pizza ended up very crispy (almost crunchy) with plenty of browning.

As a result of today's lesson, I'm gonna keep the yeast at 3% for the next batch (but the room-temperature bulk ferment will be much shorter), and I'll keep the sugar at 1.5%. There will be no oil in the dough, and I'll probably change the hydration to 41%, rather than 40%.
2% Sugar


Update (9/30/12): Made from dough that I mixed yesterday, today's pizza was almost a perfect clone of Pizza Hut thin. Here's the dough formula:

Nearly Perfect Pizza Hut Thin Formula
100% KAAP flour
41% Water
3% ADY
2% Salt
1.5% Sugar

Mixed for about 12 minutes (until there was no loose flour in the mixer bowl), then into the fridge for about 36 hours. Removed from the fridge 6-8 hours before I intended to make the pizza. Rolled the dough, topped, and baked for 11 minutes at 500 on a preheated stone. (11 minutes was a little too long of a bake time. Next time I'll only bake for 10 minutes.) If you don't want to refrigerate this dough, I think this dough would work fine after a 4-hour room-temperature bulk ferment.

I don't plan on making this style of pizza for a while. But whenever I do it again, I will use this formula, rather than the formula at the beginning of this post. Also, I will make the dough in the morning and allow it to bulk ferment at room temperature for around 4 hours. Whenever I get around to doing this again, I will take a whole bunch of pictures, then write a new post, documenting every step.

Note: Instant yeast is probably more appropriate for this dough than active dry yeast. If I had instant yeast, I would try 1% to 1.5%.

Posted by Picasa